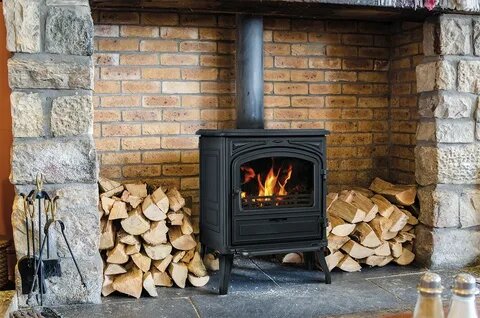
Installing a wood-burning stove is an excellent way to introduce a cozy, warm ambiance to your home while potentially reducing your energy costs. If you’ve chosen a single wall pipe, you’ll want to make sure it’s installed correctly to maintain safety and efficiency. Below, we’ll guide you through each step of installing a wood-burning stove with a single wall pipe and explain some key considerations along the way. For high-quality wood-burning stoves and accessories, consider browsing Caledonian Stoves, a trusted source in the industry.
Step 1: Preparing for Installation
Before starting the Wood burning stove installation, check local building codes and requirements, as wood-burning stoves have specific safety regulations. You’ll also need to consult your homeowner’s insurance, as they may have specific guidelines to follow for wood stove installations.
Choosing the Right Location
Finding the ideal location for your wood-burning stove is crucial for safety and comfort. Make sure the area allows for adequate clearance between the stove and nearby walls, as a single wall pipe requires more space due to its heat output. Consider placing the stove near an exterior wall, as this can simplify the chimney installation.
Gather Necessary Tools and Materials
Having the right tools on hand will make the installation process smoother. Here’s a list of essential items you’ll need:
- Wood-burning stove and single wall pipe kit
- Chimney pipe
- Ceiling support box
- Wall pass-through kit (if the pipe will go through a wall)
- High-temperature caulking
- Power drill and drill bits
- Measuring tape and pencil
- Screwdriver and screws
Caledonian Stoves offers a range of high-quality stove kits, parts, and accessories, making it easier to source everything you need from one place.
Step 2: Installing the Hearth Pad
To protect the floor from heat, a hearth pad must be installed beneath your stove. This is typically a non-combustible material like stone, tile, or metal. The size of the hearth pad depends on the stove and local regulations, so consult your stove’s manual and local codes to determine the correct dimensions.
- Measure and mark the area where you’ll place the hearth pad, ensuring that it extends adequately beyond the front, sides, and back of the stove.
- Install the hearth pad by placing it securely on the floor, ensuring it’s level and meets clearance guidelines.
Step 3: Positioning the Stove
Place your wood-burning stove on the hearth pad, aligning it with the location you marked. Maintain proper clearance from the walls and ceiling as per the stove manufacturer’s recommendations.
- Measure and mark where the stovepipe will exit the stove and connect to the chimney pipe.
- Double-check the measurements and clearances to make sure they align with your installation plans.
Step 4: Installing the Single Wall Pipe
A single wall pipe connects the stove to the chimney system. Remember, single wall pipes can get extremely hot, so follow clearance requirements carefully. Single wall pipes generally require a minimum of 18 inches of clearance from any combustible materials, including walls and ceilings.
- Connecting the Single Wall Pipe
Attach the single wall pipe to the stove outlet, securing it tightly. Use the screws provided with your kit to fasten the pipe to the stove outlet, ensuring there are no gaps where smoke could escape. - Pipe Configuration
Install the pipe sections by sliding one end of each pipe into the other. Secure each connection with screws, typically three screws per joint, spaced evenly. If you’re using multiple sections, ensure each connection is tight to prevent leaks. - Testing the Angle
Check that the pipe is angled properly, as it should have a slight rise toward the chimney. This rise helps improve the draft, which is essential for efficient burning and safety.
Step 5: Creating a Wall or Ceiling Pass-Through
If the pipe needs to pass through a wall or ceiling, you’ll need a wall or ceiling pass-through kit to ensure the pipe’s safety and insulation.
- Marking the Opening
Use a pencil to mark the opening on the wall or ceiling where the pipe will pass through. For accuracy, measure the pipe’s diameter and add an extra few inches for clearance around the pipe. - Cutting the Opening
Using a drill and saw, cut out the marked opening. Be cautious of electrical wiring or plumbing that may be hidden in the walls. - Installing the Pass-Through Kit
Fit the pass-through kit into the hole and secure it in place with screws. This kit acts as a fire-resistant barrier between the pipe and any combustible materials in the wall or ceiling.
Step 6: Installing the Chimney Pipe
The chimney pipe will extend from your ceiling or wall to the roofline and beyond, safely directing smoke outside.
- Securing the Chimney Pipe
Attach the chimney pipe to the single wall pipe using an adapter if needed. Once connected, ensure the chimney pipe is securely attached to the pass-through kit. - Chimney Pipe Extension
Extend the chimney pipe up through the roof to a height recommended by building codes (typically 2-3 feet above the roof ridge). The height is essential for creating a proper draft, ensuring that smoke rises effectively. - Weatherproofing
Apply high-temperature caulk around the flashing to prevent water from leaking into your home. The flashing seals the area where the chimney pipe passes through the roof, providing a weatherproof barrier.
Step 7: Performing a Safety Check
Once your wood-burning stove and single wall pipe are fully installed, performing a safety check is crucial to ensure everything functions properly.
- Inspect All Connections
Verify that all connections are tight and secure. Check for any gaps or loose fittings where smoke or gases could leak. - Clearance Check
Double-check that the stove and single wall pipe meet clearance requirements from combustible materials. - Smoke Test
Light a small fire in the stove to check the draft. If smoke escapes into the room, you may need to adjust the chimney height or inspect for obstructions in the pipe. - Carbon Monoxide Detector
Install a carbon monoxide detector in the same room as the stove to alert you in case of any dangerous gas buildup.
Maintenance Tips
To keep your wood-burning stove operating efficiently and safely, regular maintenance is key.
- Clean the Chimney Regularly: Over time, creosote can build up inside the chimney and become a fire hazard. Aim to clean it at least once a year, especially if you use your stove frequently.
- Inspect the Seals: Check the door seals, gaskets, and stovepipe connections to ensure they remain airtight.
- Ash Removal: Regularly clear out the ashes to keep the airflow optimal, which helps maintain efficient burning.
Final Thoughts
Installing a wood-burning stove with a single wall pipe can transform your home into a warm, inviting space. By following these steps carefully, you can ensure that your installation is safe, efficient, and up to code. Always consult the manufacturer’s guidelines for your specific model, and check local regulations for compliance.
For a reliable selection of high-quality wood stoves and installation accessories, Caledonian Stoves is a top choice. They offer a wide variety of stoves and components to help make your installation process as straightforward as possible. With the right preparation and products, you’ll be enjoying the warmth and beauty of a wood-burning stove in no time.


